noteshelf app
Articles May 02
By Key2Success Team 0 Comments

What is the Noteshelf App?

The Noteshelf app is a note-taking app available for iOS and Android devices (but won’t sync between iOS and Android if you’re using both types of devices). It allows users to handwrite notes, sketch drawings, annotate PDFs, and organize their notes in various notebooks. 

The Noteshelf app supports different templates, pens, highlighters, and colors to customize the note-taking experience. Users can also sync their notes across devices and export them in various formats such as PDF or image files.

It’s popular among students, professionals, and anyone who prefers handwritten notes over typed ones.

In this article, we’ll explore:

  • What is the Noteshelf app
  • How to install and set up the Noteshelf app
  • Digital Planning on the Noteshelf app
  • Best Digital Planner for the Noteshelf app

Visit the Noteshelf App Digital Planner Shop

noteshelf app screenshot

Noteshelf App: The Basics

To get started with the Noteshelf app, follow these steps:

  1. Download the App: Go to the App Store (iOS) or Google Play Store (for Android devices) on your mobile device. Search for “Noteshelf” and download the app to your device.

  2. Install and Open: Once the app is downloaded, install it on your device. After installation, open the app by tapping on its icon.

  3. Explore the Interface: Familiarize yourself with the Noteshelf app’s interface. You’ll see options for creating new notebooks, importing documents, accessing settings, and more.

  4. Create a Notebook: Start by creating a new notebook or importing a notebook. You can choose from various paper-style templates (e.g., ruled, grid, blank) depending on your preference. Give your notebook a title to help you identify it later.

  5. Start Taking Notes: Once you’ve created a notebook, you can start taking notes. Use your finger or a stylus to write or draw on the screen. Noteshelf offers different pen types, colors, and sizes for customization.

  6. Explore Features: Explore the features offered by Noteshelf, such as adding text boxes, inserting images, highlighting, erasing, and more. Experiment with different tools to see what works best for your note-taking needs.

  7. Organize Your Notes: Organize your notes by creating multiple notebooks for different subjects, projects, or purposes. You can also group related notes within a single notebook using sections or tags.

Visit the Noteshelf App Digital Planner Shop

PDF planner daily page

Noteshelf Digital Planning

Using the Noteshelf app for digital planning can be a great way to stay organized and productive. Here’s how you can do it:

  1. Create Digital Planners: Start by designing or downloading digital planner templates compatible with Noteshelf. These templates often include monthly, weekly, and daily layouts, as well as sections for goals, to-do lists, habit tracking, and more.

  2. Import Templates: Once you have your digital planner templates ready, import them into Noteshelf. You can usually do this by importing PDF files directly into the app. Make sure the templates are formatted correctly for digital use. Want more templates – check out these!

  3. Customize Your Planner: Noteshelf offers various tools for customization. You can use different pen colors, highlighters, stickers, and text boxes to personalize your planner. Add your own categories, labels, or sections according to your planning needs.

  4. Plan Your Schedule: Use the digital planner to schedule your appointments, tasks, deadlines, and events. You can do this by typing directly into the planner or by handwriting with a stylus or your finger, depending on your preference.

  5. Set Reminders and Alerts: Noteshelf may not have built-in reminder features, but you can set alarms or reminders on your device to alert you about upcoming tasks or events entered in your digital planner.

  6. Track Progress: Use the planner to track your progress on goals, habits, or projects. You can mark tasks as completed, update progress bars, or add notes about your achievements or challenges.

  7. Sync Across Devices: If you use Noteshelf on multiple devices, make sure to enable syncing so that your digital planner is always up to date across all your devices.

  8. Backup Your Data: Regularly backup your digital planner to ensure that you don’t lose any important information. Noteshelf often provides options for backing up your notes either locally or to cloud storage services.

  9. Experiment and Adjust: Don’t hesitate to experiment with different layouts, colors, and organization methods to find what works best for you. Digital planning is flexible, so feel free to adjust your system as needed.

Visit the Noteshelf App Digital Planner Shop

Key2Success Digital Planner on Noteshelf

The Noteshelf app is great for digital planning. As a digital planning enthusiast, I’ve had my fair share of experiences with various devices and platforms. 

When it comes to note-taking, the Samsung Tab, coupled with the NoteShelf app, offers a great experience. I’ve had the chance to explore its features, and I’m excited to share my insights with you.

Why Samsung Tab for Note-Taking?

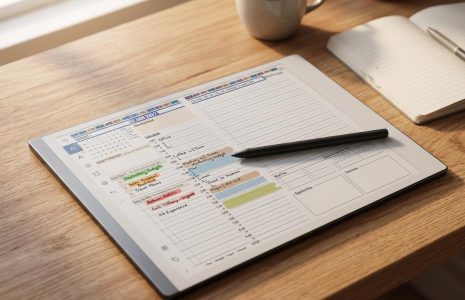
The latest version of the Samsung Tab boasts impressive features, including a pen with a response time of just nine milliseconds. This enhances the handwriting experience, which is crucial for effective digital note-taking. Plus, the convenience of charging the pen directly on the device adds to its appeal.

Introducing NoteShelf

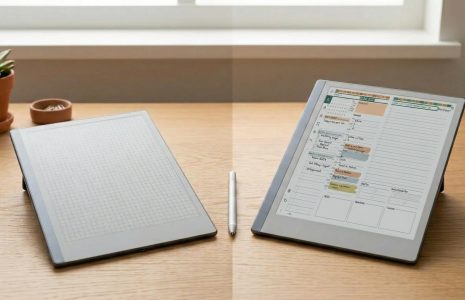
NoteShelf is an app I’ve grown to appreciate for its versatility in note-taking. While some users may prefer OneNote for its cross-platform compatibility, the Noteshelf app shines on the Samsung Tab and Android devices. It seamlessly syncs across these platforms, ensuring your notes are accessible wherever you go.

Getting Started with NoteShelf

  1. Downloading the App: Head to the Google Play Store, search for NoteShelf, and install the app. Note that there’s a fee associated with downloading the app.

  2. Opening the App: Upon installation, NoteShelf will appear among your apps. Open it and explore its features.

  3. Syncing Across Devices: In the settings, connect NoteShelf to your preferred cloud storage service for seamless syncing across devices.

Exploring NoteShelf’s Features

1. Importing Digital Planner

Import your preferred digital planner into NoteShelf. Make sure to download it directly onto your device for optimal performance.

2. Handwriting and Typing

Utilize the pen tool for handwriting notes or use the text tool for typing. NoteShelf offers various pen types, colors, and thickness options for customization.

3. Highlighting and Erasing

Highlight important sections or erase mistakes effortlessly with NoteShelf’s highlighting and erasing tools. You can even erase specific strokes or portions of your notes.

4. Adding Multimedia

Enhance your notes by adding images, audio recordings, or additional documents directly onto the page.

5. Navigation and Organization

Easily navigate through your digital planner with NoteShelf’s intuitive navigation tools. Organize your notes by creating sections, duplicating pages, or searching for specific content.

Final Thoughts

The combination of Samsung Tab and NoteShelf offers a powerful solution for digital planning and note-taking. Whether you’re a seasoned digital planner or new to the concept, NoteShelf’s user-friendly interface and robust features make it a valuable tool for boosting productivity and organization.

Visit the Noteshelf App Digital Planner Shop

Leave a Comment